How to install, use and build Sencha Touch 2.1 apps on Windows
Sencha Touch is a Javascript Framework used for building high performance cross platform mobile apps. My experience with installing Sencha Touch was horrible. The docs are severely lacking with outdated and conflicting information. With much experimentation, web searching and thanks to some help on the Sencha forum I managed, finally to get it installed. This post deals with installing Sencha Touch, generating your first app and ‘building’ it so it’s ready for production web use. It doesn’t cover coding a Touch app or packaging your app for iOS and Android which I expect to cover in another post.
This was a piecemeal process and very much a learning experience. There may be errors in my recommendations or assumptions but the end result works for me. If I were to do it again I’d most likely choose a more ordered folder structure for the various installations just for the sake of good housekeeping.
Briefly, if like me you struggled to cut through the marketing hype, these are the core Sencha Products and what they do:
- Ext JS – Javascript framework for developing desktop apps.
- Touch – Javascript framework for developing mobile apps.
- Architect – Standalone product for developing Ext JS or Touch apps using a GUI (as oppose to hand coding)
For the record, I am only concerned with Touch. I tried Architect but found the documentation so lacking that I gave up and decided to just use Touch instead. Unless you are an OEM, Touch is free to use. Architect is a paid product.
Installing and using Sencha Touch 2.1
What you need – I provide specific download links in the instructions below:
- Sencha Touch 2.1
- Sencha Command 3.0
- Ruby
- SASS
- Compass
- JRE
- Ant
- Apache (or similar local web server)
1. Apache
First up, if you don’t have a local webserver installed, do it now. Because I’ve used it before, I chose Uniform Server, a WAMP server (Windows Apache MySQL PHP). Uniform Server downloads as an exe (Coral_8_7_2.exe in my case). Run the exe and point it to the folder you want to work from. I chose:
C:\Users\Gareth\Documents\Sencha
So the path to my web root is:
C:\Users\Gareth\Documents\Sencha\UniServer\www
Next we need to allow other devices on your network to access the new Apache installation. This assumes the IP address used by your network is 192.168.1.X. If it’s different, you will need to change the input below accordingly. In the above folder there should be an .htaccess file. Open it in a text editor and change line 9 from:
Allow from 127.0.0.1
To
Allow from 127.0.0.1 192.168.1.0/24
192.168.1.0/24 allows any device using an IP in 192.168.1.X range to access your server.
Click Start_as_program.exe form C:\Users\Gareth\Documents\Sencha\UniServer folder. Don’t worry about passwords if prompted. From the interface click ‘Start Apache’ and it should open a browser window with the Uniform Server homepage.
To access your server from another device (i.e. your mobile or tablet) you need to enter the IP address of the machine you installed Uniform Server on in the web browser. To find your IP Address, open a command prompt (start > type ‘cmd’in the search box and press enter) and type ipconfig. In the first few entries you will see a line that says IPv4 address. Make a note and type this in your mobile browser address bar and you should see the Uniform Server homepage.
Note: Your IP Address could change every time you restart your machine so you will need to know it to be able to see it from your mobile or tablet.
2. JRE
Next install JRE – Java Runtime Environment. Download from:
http://www.oracle.com/technetwork/java/javase/downloads/jre7-downloads-1880261.html
I chose Windows x64 ( jre-7u10-windows-x64.exe at the time), you should choose the correct version for your system. I left the default install options which made the install path:
C:\Program Files\Java
3. Ant
Install Ant. Download from:
http://ant.apache.org/bindownload.cgi
Ant is a library used by other tools when building applications. Download, unzip and move the files to the folder of your choice. I chose c:\ant because that what’s mentioned in the install guide. Assuming you used c:\ant, you should have the folders C:\ant\bin, C:\ant\etc and so on.
Now, open a command prompt. At the prompt type:
set ANT_HOME=c:\ant
set PATH=%PATH%;%ANT_HOME%\bin
Close the command prompt window.
4. Ruby
Install Ruby. Download from:
http://rubyinstaller.org/downloads/
I used the defaults which installed to C:\Ruby193 and checked all 3 options:

Once Ruby is installed, open a command prompt. Type:
ruby -v
This should display a line which looks similar to:
Ruby 1.9.3p362 (2012-12-25) [i386-mingw32]
5. Compass and SASS
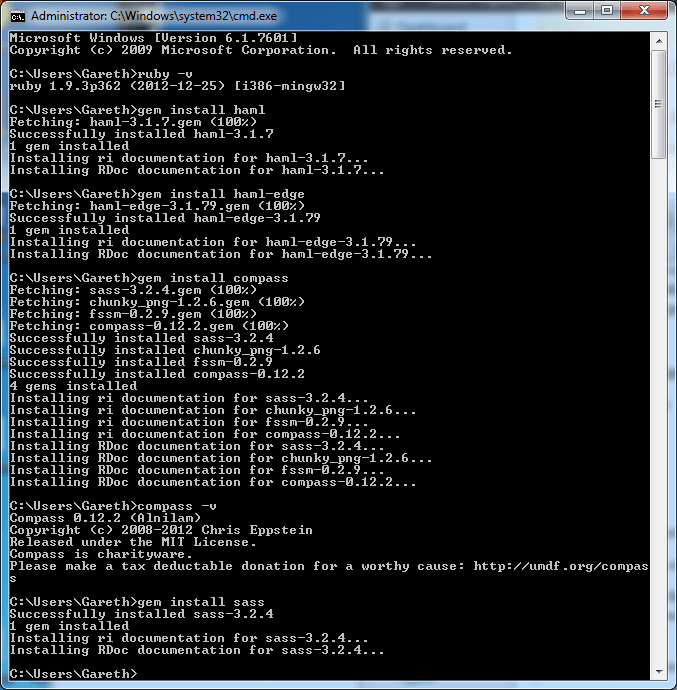
Assuming the above works, in the same command prompt or a new one, enter the following 4 commands, waiting for each to complete before typing the next. These commands install items, including Compass and SASS which Sencha relies on when building apps:
- gem install haml
- gem install haml-edge
- gem install compass
- gem install sass

6. Sencha Touch
Install Sencha Touch. Download from:
http://www.sencha.com/products/touch/download/
At certain points in their documentation, Sencha refer to this is the Sencha Touch SDK (not to be confused with the obsolete Sencha Touch SDK Tools). I downloaded the GPL version sencha-touch-2.1.0-gpl.zip and extracted the contents to:
C:\Users\Gareth\Documents\Sencha\UniServer\www\sencha-touch-2.1.0-gpl
So I have the following example folders:
C:\Users\Gareth\Documents\Sencha\UniServer\www\sencha-touch-2.1.0-gpl\builds
C:\Users\Gareth\Documents\Sencha\UniServer\www\sencha-touch-2.1.0-gpl\cmd
C:\Users\Gareth\Documents\Sencha\UniServer\www\sencha-touch-2.1.0-gpl\docs
Etc
7. Sencha Command
Install Sencha Command. Download from:
http://www.sencha.com/products/sencha-cmd/download
(SenchaCmd-3.0.0.250-windows.exe.zip for me). I used the default install directory which was C:\Users\Gareth\bin so ended up with the following example directories:
C:\Users\Gareth\bin\Sencha\Cmd\3.0.0.250\ant
C:\Users\Gareth\bin\Sencha\Cmd\3.0.0.250\lib
C:\Users\Gareth\bin\Sencha\Cmd\3.0.0.250\phantomjs
Etc
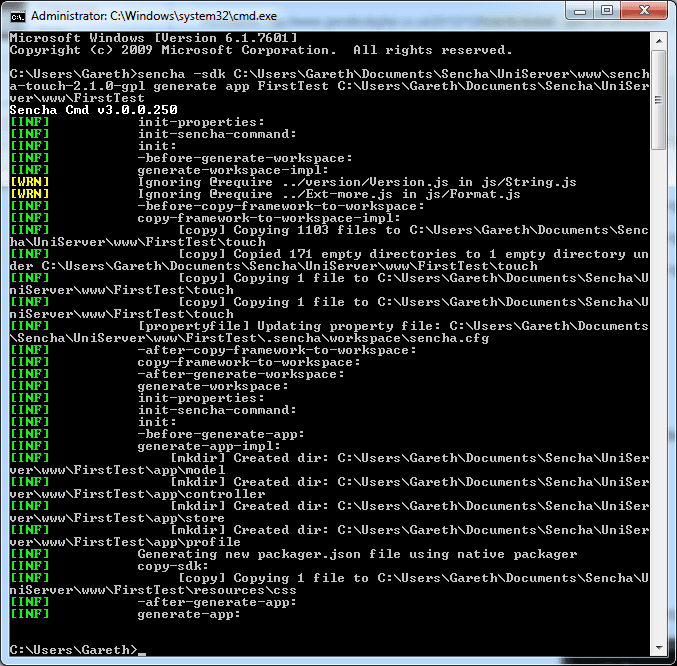
That should be it. Close all command prompts and then open a new one and type the following. You will need to change the paths to the correct ones. The first path is the path to where you installed Sencha Touch, the second is where you want your app folder:
sencha –skd C:\Users\Gareth\Documents\Sencha\UniServer\www\sencha-touch-2.1.0-gpl generate app FirstTest C:\Users\Gareth\Documents\Sencha\UniServer\www\FirstTest

This will create a folder in the www directory called FirstTest which contains all the files for a basic Sencha Touch app. If you visit http://localhost/FirstTest (using Chrome) you should see the app:

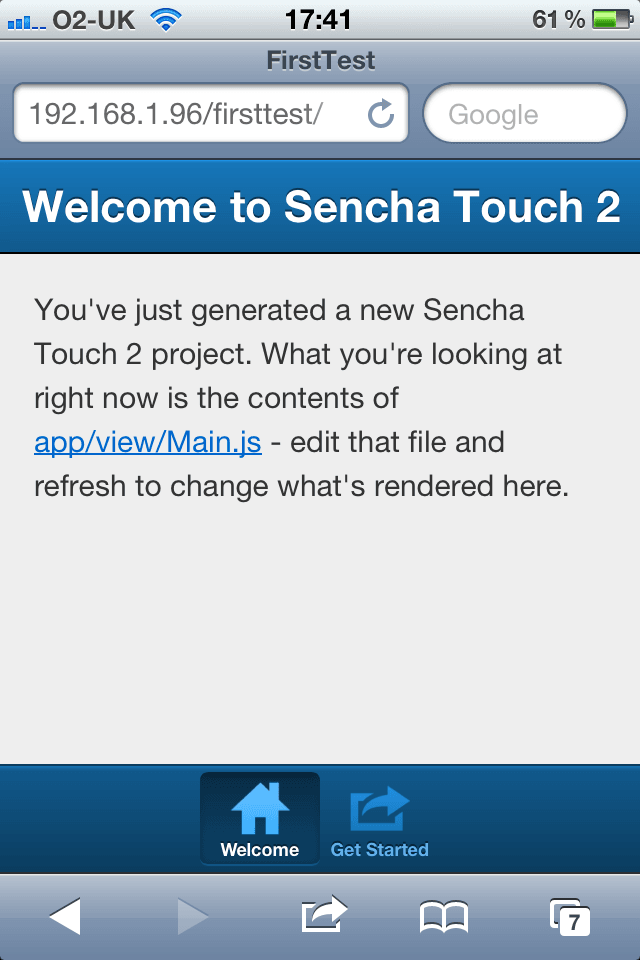
My local IP Address is 192.168.1.96 so if I visit http://192.168.1.96/FirstTest on my iPhone I see:

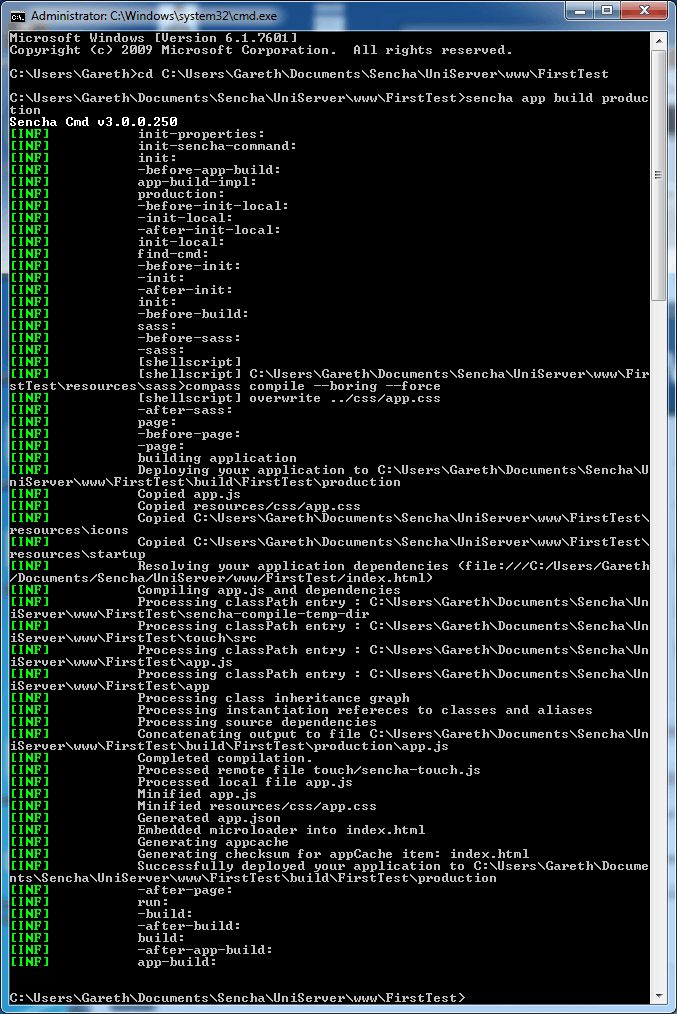
Finally, to ‘build’ your app, that is, to export it in a format optimised for a particular environment, open a command prompt, change directory to the one we created for your FirstTest, and type:
sencha app build production

Your output should look like the screen shot below and your FirstTest folder should contain a new folder tree of ‘build/FirstTest/production’. Now, if you navigate to the address below you will be viewing the optimised, production ready version of your app:
http://192.168.1.96/FirstTest/build/FirstTes/production
That’s it. You should be up and running. The following resources where used by me and might help you if you get stuck:
http://www.ladysign-apps.com/developer/sass/installing-sass-compass-for-windows-os-x/ installing compass and sass on windows.
http://ant.apache.org/manual/install.html#windows – installing ant on windows
http://www.sencha.com/forum/showthread.php?252680-Docs-appalling-how-to-actually-get-started – my forum thread where Brice Mason provided a concise list of requirements.


You helped me allot with this tut ! tnx
Thanks man.. this must work, let me try out
will get back if i find any ore problems
Thank you very much for your help!
I really appreciate it!
Wow! After hrs of struggling I found your tutorial… it probably saved my cat’s life! He sensed my frustration and was hiding! I had to fiddle a bit with the final path, but finally got things to work. I strongly suspect you saved me about 2 days of frustration… and Phoebe the Cat Thanks you as well!!!!
Our main aim in writing these articles is to prevent cat cruelty so you’re very welcome :)